Web API connection: instructions for developers
This article describes how the Web API interface connection is implemented between the customer organisation’s service and Suomi.fi e-Authorizations.
- The instructions are meant for the technical expert of the customer organisation’s service.
Using the Web API interface connection, the mandate check queries of the e-Authorizations service can be conducted via the public internet, which means that you do not need a separate security server. You can also do the implementation on the basis of an interface description only, but this article may help.
Preconditions
Before the implementation of the Web API connection between the customer organisation’s service and the e-Authorizations service can begin, the following conditions must be met:
- The deployment of the Digital and Population Data Services Agency’s e-Authorizations service has provided the customer organisation with the three identifiers needed to use the Web API: Web API Client ID, API Key and OAuth Password.
- The customer organisation has provided a return address for the Digital and Population Data Services Agency’s deployment of the e-Authorizations service. The return address must be secured with the HTTPS protocol.
- The person in charge of the technical implementation in the customer organisation has familiarised themselves with the following:
- Web API -rajapintakuvaus
- Technical material for the e-Authorizations service.
Steps for the deployment of the interface connection
The technical deployment of the Web API interface connection can be roughly divided into the following steps:
- Getting to know interface descriptions
- Checking data connections in the test environment
- Test calling the interfaces with a predefined source code
- Calling interfaces from the program code
- Verification of implementation in the test environment
- Checking data connections in the production environment
- Verification of implementation in the production environment.
1. Getting to know interface descriptions
The Web API provides a selection interface through which you can choose the objects for acting on behalf of another party, that is, the persons related to the granting of the mandates. The Web API also offers REST query interfaces that are for queries on the right to use the service, in other words, to check that the person has the right to act on behalf of the other person.
REST / JSON interfaces, which are protected with API Key or OAuth2 + +API Key authentication, are used for calling the interface. Learn more by reading the following materials:
- Detailed description of the Web API and the selection interface
- Documentation of the OAuth2 authorisation protocol.Opens in a new window.
2. Checking data connections in the test environment
Before starting the technical implementation of the e-Authorizations service, you should check that the data communications connections work between the customer organisation’s service and the Web API of the e-Authorizations service.
The e-Authorizations service requires that the header section of the requests sent to its Web API includes the necessary identifiers and a checksum. However, you can also test the data communications connection without identifiers and a checksum by using a browser or a command-line tool, such as the addresses shown below. In this case, the answer is ”Http Error 403 Forbidden”.
Address of the service in the test environment
Contact point (rova_host):
- https://asiointivaltuustarkastus.test.suomi.fi/
Example of an HPA (acting on behalf of another person) registration invitation:
- https://asiointivaltuustarkastus.test.suomi.fi/service/hpa/user/register/ed4b7ae7/080297-915A?requestId=02fd35dc-99e6-477b-b6e2-03f02cbf3666
Checking data connections with the command-line tool in the test environment
In the test environment, you can use the command-line tool to verify that the data communications connection is working as follows:
$ wget https://asiointivaltuustarkastus.test.suomi.fi/service/hpa/user/register/ed4b7ae7/080297-915A?requestId=02fd35dc-99e6-477b-b6e2-03f02cbf3666
--2017-02-08 14:37:32-- https://asiointivaltuustarkastus.test.suomi.fi/service/hpa/user/register/ed4b7ae7/080297-915A?requestId=02fd35dc-99e6-477b-b6e2-03f02cbf3666
Establishing the address asiointivaltuustarkastus.test.suomi.fi (asiointivaltuustarkastus.qa.suomi.fi)... 131.207.22.80
Connecting to the server asiointivaltuustarkastus.test.suomi.fi (asiointivaltuustarkastus.qa.suomi.fi)|131.207.22.80|:443... yhdistetty.
HTTP request sent, waiting for response... 403 Forbidden
2017-02-08 14:37:32 VIRHE 403: Forbidden.
If the connection works, the command line prints
”131.207.22.80|:443… yhdistetty”.3. Test calling the interfaces with a predefined source code
A predefined source code is available for calling the Web API in two programming languages. The source codes can be used for testing and as a basis for your own implementation.
- Source code for calling the Web API using Node.jsOpens in a new window.
- Source code for calling the Web API using JavaOpens in a new window.
You do not necessarily have to use predefined source codes, but they might make testing and implementation easier.
Using Node.js Client for testing
Web API Node Client includes all necessary functionalities for implementing the customer’s side of the service. It is intended for testing the service, familiarising yourself with it and supporting its implementation. It is not designed for production purposes, so do not use it for production as it is under any circumstances.
When using Node.js for testing, do as follows:
- Install Node.js (version 6.6.0).
- Download the Node Client project from GitHub.
- Add certificates to the project directory (see an example of creating test certificates below).
- Add the config.json file to the project directory. To the file, add the certificate file details and the identifiers that you have received from the project manager of the deployment of the e-Authorizations service.
- On the command line, run “npm install” and “node WebApiClient.js”.
- Open your browser and go to /register/hpa/[HETU]. Examples: HPA (acting on behalf of a person): https://localhost:8904/register/hpa/010180-9026
YPA (acting on behalf of a company): https://localhost:8904/register/ypa/031046-9982. - The right to use services query starts and directs you to the selection of the e-Authorizations service’s client. When selected, the end result of the query is printed in the browser window. It can be as shown in Figure 1, for example.

openssl req -new > cert.csr
openssl rsa -in privkey.pem -out key.pem
openssl x509 -in cert.csr -out cert.pem -req -signkey key.pem -days 1001
cat key.pem>>cert.pem
Debugging Node.js Client
To understand the operating logic of Node.js Client, it may be useful to debug code. It helps you better understand the order in which functions are performed and the content of the variables.
You can open the debug mode through the command line as follows:
ode --inspect --debug-brk WebApiClient.js
Debugger listening on port 9229.
Warning: This is an experimental feature and could change at any time.
To start debugging, open the following URL in Chrome:
chrome-devtools://devtools/bundled/inspector.html?experiments=true&v8only=true&ws=127.0.0.1:9229/2746fa2b-704a-4a88-acdc-166f60e183d4
Debugger attached.
Then, copy, and paste in the address bar of your Chrome browser, the URL that has been printed on the command line (starting with chrome-devtools://). After that you can add stops in the source code and start the query on the right to use a service as described earlier.
4. Calling interfaces from the program code
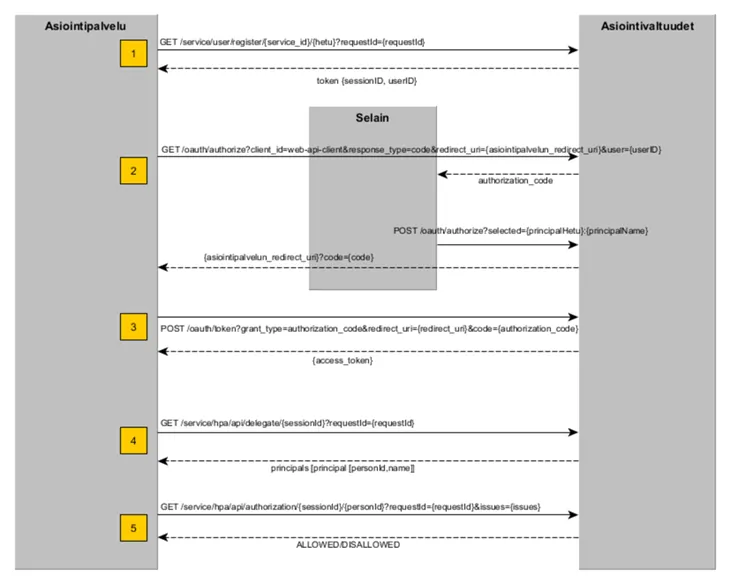
4.1 Acting on behalf of a person (HPA)
The following describes the stages of the right to act on behalf of a person (Web API HPA). The description shows the variables to be transmitted in the request and response messages. In addition, some service-specific constants must be forwarded in the query. The service-specific constants of the query on the right to use a service are described in the Web API description.
1.(GET) Register the Web API session: {rova_host}/service/hpa/user/register/{client_id}/{hetu}?requestId={requestId}
- in the header section: X-AsiointivaltuudetAuthorization (checksum)
- extract sessionId from the answer
- extract userID from the answer.
2.(GET) Move the user to the e-Authorizations service’s client selection: {rova_host}/oauth/authorize?client_id={client_id}&response_type=code&redirect_uri={redirect_uri}&user={user}&lang={lang}
- forwarding userId as the user value of the URL variable
- the user is directed to the redirect URL where the parameter is code
- extract authorization_code from the answer.
3.(POST) Send the authorization_code: {rova_host}/oauth/token?grant_type=authorization_code&redirect_uri={redirect_uri}&code={code}
- forwarding authorization_code as the code value of the URL variable
- forwarding HTTP Basic Authorization header
- extract from the answer access_token.
4.(GET) Retrieve the selected client or clients: {rova_host}/service/hpa/api/delegate/{sessionId}?requestId={requestId}
- calculating the checksum (see section Calculation of the checksum below)
- forwarding in the header section: X-AsiointivaltuudetAuthorization (checksum)
- forwarding access_token in the header section
- forwarding the sessionId in the URL
- Extract a list of social security numbers from the answer
5.(GET) Send the query on the right to use a service: {rova_host}/service/hpa/api/authorization/{sessionId}/{personId}?requestId={requestId}&issues={issues}
- calculating the checksum (see section Calculation of the checksum below)
- forwarding in the header section: X-AsiointivaltuudetAuthorization (checksum)
- forwarding access_token in the header section
- forwarding the sessionId in the URL
- forwarding the issues parameter as value URI if you want the query to apply to a specific object (= URI that uniquely identifies the matter in the mandate theme code list)
- extract from the answer ALLOWED/DISALLOWED.
An answer to query on the right to use a service when acting on behalf of a person can be, for example, as follows:
[{"result":"ALLOWED","reasons":[],"principal":{"personId":"120508A950F","name":"Kumpulainen Anni Emilia"}}]Figure 2 summarises how the above-mentioned query on the right to use a service when acting on behalf of a person proceeds.
 AuthorizationList
The AuthorizationList query makes it possible to retrieve all service roles granted by the selected client at once. The service role determines what kinds of matters the agent has the right to manage on behalf of the client. For example, a legally competent person can have authorisation to manage their parents’ pharmaceutical matters but not banking matters.
The AuthorizationList response contains information on service roles for which the client has authorised the agent. The right to act on behalf of a client is indicated in the roles field, the value of which is either ALL (unlimited right to act on behalf of the client) or a list of matters (issue URI) that the right to act on behalf of the client applies to. The response may have more than one service role. An empty list means that there is no authorization.
The AuthorizationList query is directed to /service/hpa/api/authorizationlist/.
The following is an example response to the AuthorizationList query. In the example, person 010132-998W has the following mandates: establishing adoption data, establishing vehicle data, establishing war child data and ordering a report on family relationships.
[{"reasons":[],"roles":
["http://valtuusrekisteri.suomi.fi/sotalapsitietojen_selvittaminen",
"http://valtuusrekisteri.suomi.fi/adoptiotietojen_selvittaminen",
"http://valtuusrekisteri.suomi.fi/sukuselvityksen_tilaaminen",
"http://valtuusrekisteri.suomi.fi/ajoneuvotietojen_selvittaminen"],
"principal":{"personId":"010132-998W","name":"Tuulispää Edelweiss"}}]
The following is an example answer when acting on behalf of a minor dependent:
[{"reasons":[],"roles":["ALL"],"principal":"personId":"120508A950F","name":"Kumpulainen Anni Emilia"}}]4.2 Acting on behalf of a company (YPA)
The following describes the stages of the right to act on behalf of a company (Web API YPA). The description shows the variables to be transmitted in the request and response messages. In addition, some service-specific constants must be forwarded in the query. The service-specific constants of the query on the right to use a service are described in the Web API description.
When acting on behalf of a company, the invitation to register for the first stage is sent to a different address than when acting on behalf of a person. The actual queries on the right to use a service, that is, stages 4 and 5, also differ from acting on behalf of a person.
1.(GET) Register the Web API session: {rova_host}/service/ypa/user/register/{service_id}/{hetu}?requestId={requestId}
- in the header section: X-AsiointivaltuudetAuthorization (checksum)
- extract sessionId from the answer
- extract userID from the answer.
2.(GET) Move the user to the e-Authorizations service’s client selection: {rova_host}/oauth/authorize?client_id={client_id}&response_type=code&redirect_uri={redirect_uri}&user={user}&lang={lang}
- forwarding userId as the user value of the URL variable
- the user is directed to the redirect URL where the parameter is code
- extract authorization_code from the answer.
3.(POST) Send the authorization_code: {rova_host}/oauth/token?grant_type=authorization_code&redirect_uri={redirect_uri}&code={code}
- forwarding authorization_code as the code value of the URL variable
- forwarding HTTP Basic Authorization header
- extract access_token from the answer.
4.(GET) Retrieve the list of target companies and their associated roles selected by the agent acting on behalf of another person: {rova_host}/service/ypa/api/organizationRoles/{sessionId}?requestId={requestId}
- calculating the checksum (see section Calculation of the checksum below)
- forwarding in the header section: X-AsiointivaltuudetAuthorization (checksum)
- forwarding access_token in the header section
- forwarding the sessionId in the URL
- extract organizationList from the answer.
An answer to query on the right to use a service when acting on behalf of a company can be, for example, as follows:
[{"name":"Asunto Oy Tampereen Ratinanpuisto","identifier":"2305162-8","complete":true,"roles":["IS"]}]4.3 Calculation of the checksum
The checksum should be attached to the header section of requests sent to the e-Authorizations Web API. Next, you can learn how to calculate the checksum using Node.js and Java. There is also a description of how to verify the function that was implemented to calculate the checksum.
An example with Node.js code
function xAuthorizationHeader(path) {
var timestamp = moment().format();
var checksum = crypto.createHmac('sha256', CLIENT_SECRET)
.update(path + ' ' + timestamp)
.digest('base64');
return CLIENT_ID + ' ' + timestamp + ' ' + checksum;
}
See the entire Node.js example code for calculating the checksum.Opens in a new window.
An example with Java code
protected String getAuthorizationValue(String path) throws IOException {
String timestamp = ZonedDateTime.now(ZoneOffset.UTC).format(DateTimeFormatter.ISO_DATE_TIME);
return config.getClientId() + " " + timestamp + " " + hash(path + " " + timestamp, config.getApiKey());
}
private String hash(String data, String key) throws IOException {
try {
Mac mac = Mac.getInstance(HMAC_ALGORITHM);
SecretKeySpec signingKey = new SecretKeySpec(key.getBytes(), HMAC_ALGORITHM);
mac.init(signingKey);
byte[] rawHmac = mac.doFinal(data.getBytes());
String result = new String(Base64.getEncoder().encode(rawHmac));
return result;
} catch (NoSuchAlgorithmException | InvalidKeyException | IllegalStateException e) {
throw new IOException("Cannot create hash", e);
}
}
See the entire Java example code for calculating the checksum.Opens in a new window.
Verification of the function performed to calculate the checksum
Use the inputs below to ensure that the function implemented to calculate the checksum works properly. When you enter the following inputs for the function, the result should be the same as below.
Path = ”/service/hpa/user/register/ed4b7ae7/080297-915A?requestId=02fd35dc-99e6-477b-b6e2-03f02cbf3666”
ClientId = ”ed4b7ae7”
ApiKey = ”3ba56df8-88b8-4805-9b04-2f8e7a61”
TimeStamp = ”2017-02-09T10:29:42.09Z”
Result:
ed4b7ae7 2017-02-09T10:29:42.09Z z7X+xWtrvth1L7Ql6B/4xZ0iQ1VjToWX4TnHVLo8RGo=4.4 Targeting the query on the right to use a service at a specific mandate theme in acting on behalf of another person
A mandate theme is used to restrict the authority of a mandate, meaning that it indicates what the person can manage on behalf of the other person. For example, the mandate theme could be vehicle registration or vehicle inspection.
You can assign a query on the right to use a service to a specific mandate theme or matters by adding a parameter to the Authorization query: &issues={issues}. For additional information on targeting the query on the right to use a service, see section Acting on behalf of a person (HPA) in the Web API description.
You can add several mandate themes as the Authorization query parameter at once. However, a negative response does not then indicate to which mandate theme the right to act has been denied. If you want to know which mandate theme has been denied the right to act on behalf of another person, you must submit a separate query for each mandate theme.
General use case:
- Person A has authorised person B to act in a mandate, or matter C. The mandate has been entered in the authorisation register.
- Service E has been established for the Digital and Population Data Services Agency for the customer organisation’s service D.
- Mandate C has been configured for service E.
- Person B logs in to service D and chooses to act in matter C.
- In the selection interface, person B selects the client, i.e. person A, on whose behalf they wish to act.
- Service D conducts an Authorization query to check whether person B has the right to act on behalf of person A in matter C.
4.5 Example of a response to acting on behalf of a company when the authorisation register includes mandates
A company whose business ID is 2036583-2 has created a mandate, “Labour immigration”, for a person whose personal identity code is 010180-9026. This person logs in and selects company 2036583-2 from the selection interface. The rule engine in service X has been configured to “The person has a mandate in the authorisation register http://valtuusrekisteri.suomi.fi/Tyoperainen_maahanmuutto”.
In this case, the query will provide the following response:
[{"name":"Maanrakennus Ari Eerola T:mi","identifier":"2036583-2","complete":true,"roles":["http://valtuusrekisteri.suomi.fi/tyoperainen_maahanmuutto"]}]5. Verification of implementation in the test environment
The service created in the test environment is freely available for testing during implementation and the verification of implementation. The test service is also available for the verification of possible changes after the transition to the production phase.
You can test the service with personal identity codes and business IDs intended for testing the e-Authorizations service.
6. Checking data connections in the production environment
The functionality of data connections must also be checked before moving to the production environment.
Address of the service in the production environment
Contact point (rova_host):
- https://asiointivaltuustarkastus.suomi.fi/
Example of an HPA (acting on behalf of another person) registration invitation:
- https://asiointivaltuustarkastus.suomi.fi/service/hpa/user/register/ed4b7ae7/080297-915A?requestId=02fd35dc-99e6-477b-b6e2-03f02cbf3666
Checking data connections with the command-line tool in the production environment
In the production environment, you can use the command-line tool to verify that the data communications connection is working as follows:
$ wget https://asiointivaltuustarkastus.suomi.fi/service/hpa/user/register/ed4b7ae7/080297-915A?requestId=02fd35dc-99e6-477b-b6e2-03f02cbf3666
--2017-02-08 13:49:47-- https://asiointivaltuustarkastus.suomi.fi/service/hpa/user/register/ed4b7ae7/080297-915A?requestId=02fd35dc-99e6-477b-b6e2-03f02cbf3666
Selvitetään osoitetta asiointivaltuustarkastus.suomi.fi (asiointivaltuustarkastus.suomi.fi)... 131.207.22.78
Yhdistetään palvelimeen asiointivaltuustarkastus.suomi.fi (asiointivaltuustarkastus.suomi.fi)|131.207.22.78|:443... yhdistetty.
HTTP-pyyntö lähetetty, odotetaan vastausta... 403 Forbidden
2017-02-08 13:49:47 VIRHE 403: Forbidden
If the connection works, the command line prints
”131.207.22.78|:443… yhdistetty”.7. Verification of implementation in the production environment
You cannot carry out the actual testing in the production environment, but you can verify the functionality of the implementation using real personal identity codes or business IDs. Test credentials do not work in the production environment.
Problem situations
In case of problems, contact the deployment team of the Digital and Population Data Services Agency’s e-Authorizations service. As a rule, you should first make sure that the problem is not caused by errors in the client side’s implementation, configurations or data communications connections.
Below is a list of problems encountered in deployment and solutions to them.
Web API HPA: The process stops at “403 Forbidden” error on page https://asiointivaltuustarkastus.suomi.fi/oauth/authorize after selecting a client on the “Select for whom you are acting” page and clicking the “Continue” button.
- Check that you are using the identifiers provided by the e-Authorizations deployment team that are specifically intended for the environment in question.
- Check that the same implementation works in the test environment.
- Solution for one deployment: The address to be called, /oauth/authorize, had one too many slashes, i.e. the address was incorrectly https://asiointivaltuustarkastus.suomi.fi//oauth/authorize?client_id=…
Web API HPA: Registration call becomes time out or there is an error message when testing in a browser "ERR_CONNECTION_REFUSED".
- For example, in the command line, use the wget tool to check the data communications connections.
- Solution for one deployment: An incorrect change had been made to the firewall of the Digital and Population Data Services Agency, which prevented data communications from an external network.
Web API HPA: Call gives an error message "HTTP 400 Bad Request".
- Check the data communications connections.
- Solution for one deployment: The customer organisation’s environment had an incorrectly configured proxy server, preventing data communications.
Web API YPA: Call gives an error message "HTTP 403 Forbidden".
- The problem is almost always due to the fact that the header information of the request is not correct. For example, the X-AsiointivaltuudetAuthorization-header may be missing completely, or the calculation of the checksum may produce an incorrect result.
- Check that you are using the identifiers provided by the e-Authorizations deployment team that are specifically intended for the environment in question.
- Check that the request contains all the necessary information.
- Check that the checksum calculation produces the correct result.
- Solution for one deployment: The RestSharp.org library used by the customer organisation to implement C# did not add the header information correctly. The problem was resolved by using the standard WebRequest C# library.
Web API YPA: Registration call returns error message "403 Forbidden".
- Check that you are using the identifiers provided by the e-Authorizations deployment team that are specifically intended for the environment in question.
- Solution for one deployment: X-AsiointivaltuudetAuthorization-header name had an extra colon after the string.
Web API YPA: Registration call returns error message "HTTP 403 Forbidden".
- The problem is almost always due to the fact that the header information of the request is not correct. For example, the X-AsiointivaltuudetAuthorization-header may be missing completely, or the calculation of the checksum may produce an incorrect result.
- Check that you are using the identifiers provided by the e-Authorizations deployment team that are specifically intended for the environment in question.
- Check that the request contains all the necessary information.
- Check that the checksum calculation produces the correct result.
- Solution for one deployment: An incorrect time zone was used in the customer organisation’s server environment, which confused the calculation of the checksum.