Connecting to the development environment
This page contains the steps for connecting to the Data Exchange Layer development environment and related support articles.
The development environment is a pilot environment for the Suomi.fi Data Exchange Layer that anyone can connect to – both private individuals and organisations. The development environment enables you to try out the Data Exchange Layer’s properties, test new versions or validate the properties of your development efforts.
You can read about the different environments of the Data Exchange Layer here.
If you are about to join the test and production environment of the Data Exchange Layer, see the related instructions for administrative and technical deployment.
Before you begin connecting to the development environment, also read this support article.
1. Set up the network environment
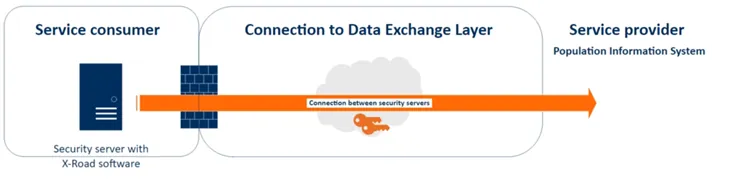
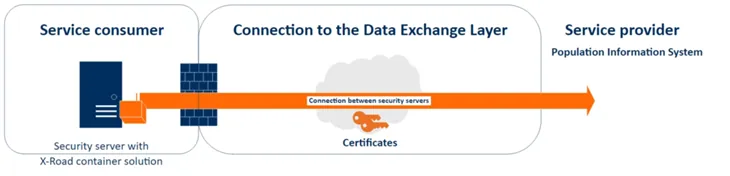
The Security Server is a server that uses X-Road software and is connected to the Data Exchange Layer. The Data Exchange Layer services are called through the Security Server.
You can set up a Security Server, for example, as a virtual machine or a Docker container on a physical server or a cloud environment.
Here are examples of light solutions for how to connect quickly to the FI-DEV development environment:
1. Virtual server set up in a cloud environment (AWS) for direct test searches (no separate information system).
2. Container server set up in a cloud environment (AWS) for direct test searches (no separate information system).
Technical requirements for example solutions
You can read about the technical requirements for Security Servers from a separate support article.
The table below shows an example of light dimensioning suitable for test use:
Solution | 1. Light/minimal virtual server | 2. Light/minial container server |
|---|---|---|
Operating system | Ubuntu 22.04 LTS | A Linux-based platform server for containers |
Process | 2 vCPU Core | 2 vCPU Core |
Main memory (RAM) | 4GB | 4GB |
Disc space | 10GB OS 20-40GB /var/for the logs | 10GB OS 20-40GB /var/for the logs |
Network | 1 Gb/s - network card connection | 1 Gb/s - network card connection |
A light solution (connection) server is capable of performing 50 queries per minute (message sizes ≤ 500 K) with continuous steady load or of transferring large amounts of data (message sizes 0.5 M–10 M) inside normal SOAP messages within a few queries per minute.
2. Name the server
Name the server as shown below:
organisaatiolpdev01.org.fi
- organisation = name of your organisation or its abbreviation
- lp = acronym for Security Server
- dev = Data Exchange Layer’s environment ID
- 01 = sequence numbering, which can be changed to name new Security Servers (such as organisaatiolpdev01, organisaatiolpdev02, organisaatiolpdev03)
You can find additional information on naming the server by reading this separate support article.
3. Fill in the application to join the development environment
To join the Data Exchange Layer’s development environment, download and fill in the application to join the development environment
and email it to palveluvayla@palveluvayla.fi.
4. Install the security server software
Follow the installation instructions for your Hosting Server:
- Installing the Data Exchange Layer software on a Ubuntu Security Server
- Installing the Security Server Software on an RHEL Security Server
- Installation of a Security Server Sidecar (Docker)
5. Register and configure the Security Server
Register the Security Server to the Data Exchange Layer in the Security Server’s management interface and configure it using the X-Road toolkit.
You can find instructions for how to use the X-Road toolkit from the support article Configuring the Security Server using the X-Road toolkit.
For basic information about the X-Road toolkit, see the support article Data Exchange Layer’s X-Road Toolkit – Security Server's automated management scripts.
After configuring the Security Server, you can switch to adding the subsystem and services. Read more: