Adding a service on a security server
This article describes how to add a new SOAP or REST service on a Data Exchange Layer security server and how to set up access rights to the services. This support article is intended for organisations that provide services through the Data Exchange Layer.
Please note, that before you can add a service on the security server you must
- add an information system to your security server and
- test the connection between the information system and the security server.
Learn more about connecting an information system to a security server.
To add a new service, go to the administration interface of the security server. The address of the administration interface of the security server is
https://{host}:4000/where {host} is replaced with the host name of the organisation’s own security server.
You can add two types of services to the Data Exchange Layer:
- A SOAP service: This service is added by entering the URL of the WSDL description.
- A REST service: To add a REST service, enter the OpenAPI 3 Description path or REST API Base Path.
A single WSDL description can contain an API description for one or more services. Several different WSDL descriptions can be added to the security server. Read more about the X-Road communication protocol for SOAP and REST.
Add a SOAP service
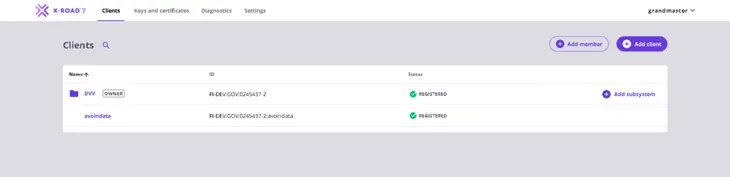
Log into the administration interface of the security server. After login, you will see a list of the subsystems added on the security server.
1. In the Client tab, select the subsystem to which you want to add the service.

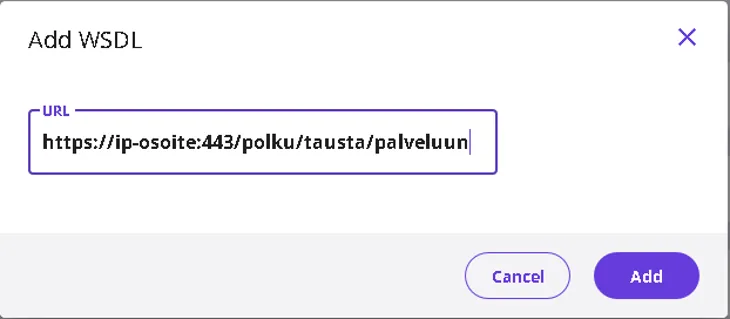
2. The Services tab shows a list of the WSDL descriptions associated with the subsystem. To add a new WSDL description, select Add WSDL.

3. Copy the URL address of the WSDL description and paste it in the URL field and select Add.
4. The WSDL description is added in a list that shows the services of the selected subsystem. It is in a passive state by default. Activate the added WSDL description using the selection switch next to it. Clicking the arrow symbol on the left side of the WSDL text opens a list of the services included in the WSDL.

5. The next day, check that the service is visible in the Test API CatalogueOpens in a new window. or the API CatalogueOpens in a new window., depending on the environment. If the service is not visible, check that all the steps above have been completed and if necessary request help from palveluvayla@palveluvayla.fiOpens in a new window.. Remember to describe the added services in the API CatalogueOpens in a new window..
Add a REST Service
A REST service can be added using the REST API Base Path or the OpenAPI3 Description Path. If you add your service using the REST API Base Path, the technical interface description of the service will not be displayed correctly in the API Catalogue. In this case, add the interface description as a separate attachment file to the API catalogue. Therefore, we recommend adding REST services to the Data Exchange Layer using the OpenAPI 3 Description path. Read more about the OpenAPI 3 specificationOpens in a new window..
This is how you can add a REST service:
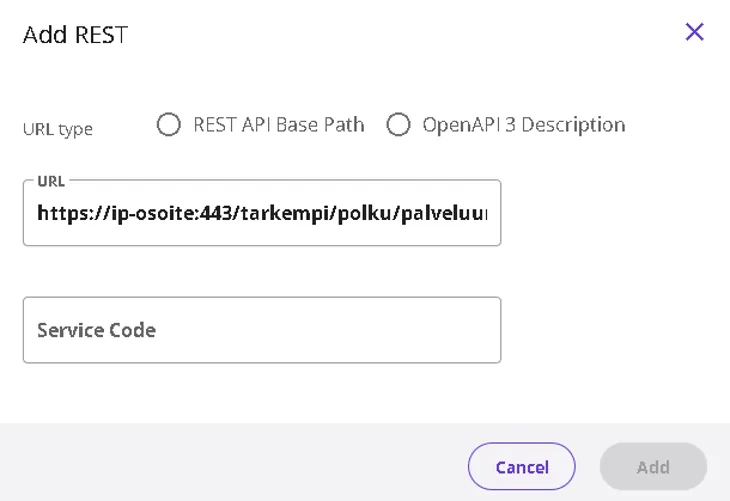
1. In the Clients tab, select the subsystem to which you want to add the service.
2. Click Add REST in the Services tab to add the REST service.

3. Select either REST API Base Path or OpenAPI3 Description as the address path type. Enter the URL and the name of the service (Service Code) in the fields. Select Add to add the service.
4. Activate the added REST service using the selection switch next to it. Before activation, check that the information on the service is correct. After activation, the service is available to users.

5. The next day, check that the service is visible in the Test API CatalogueOpens in a new window. or the API CatalogueOpens in a new window., depending on the environment. If the service is not visible, check that all the steps above have been completed and if necessary request help from palveluvayla@palveluvayla.fiOpens in a new window.. Remember to describe the added services in the API CatalogueOpens in a new window..
Configure access rights to the services
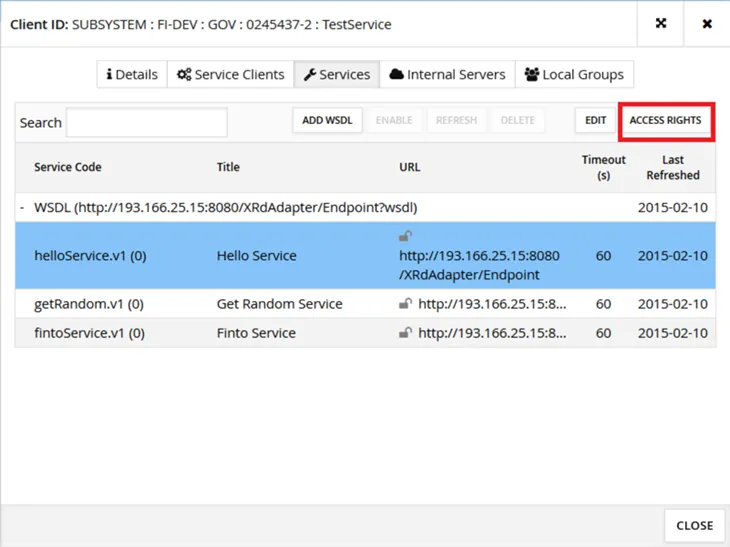
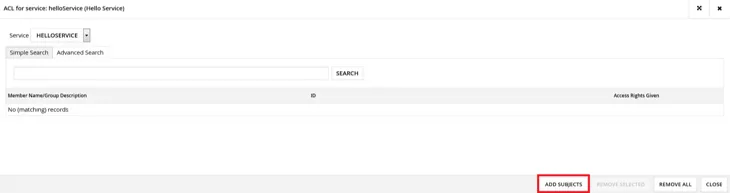
Configure access rights to the services by first selecting the service and then clicking the Access Rights button.
A window opens, listing the subsystems that have an access right to the selected service. To add a new access right, click the Add Subjects button.
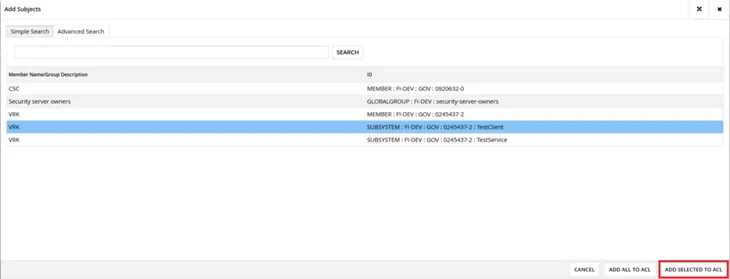
Click the Search button to see a list of all organisations that have joined the Data Exchange Layer and the subsystems of these organisations. Select a subsystem for which you wish to grant the access right. Then click the Add Selected to ACL button.
Please note! Access rights must always be granted at the subsystem level, never at the organisation level.
The selected subsystem now has the right to access the service. Close the window by clicking the Close button.
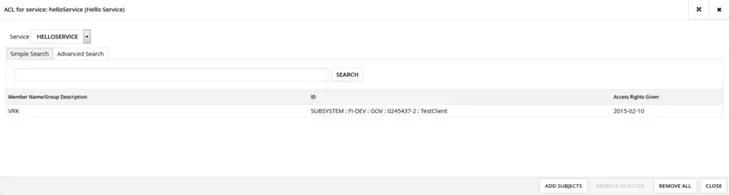
As the new access right was granted, the number in parentheses after the name of the selected service increased by one. If the number is zero, no subsystems have access rights to the service. It might be necessary to reopen the Services tab to see the updated number.
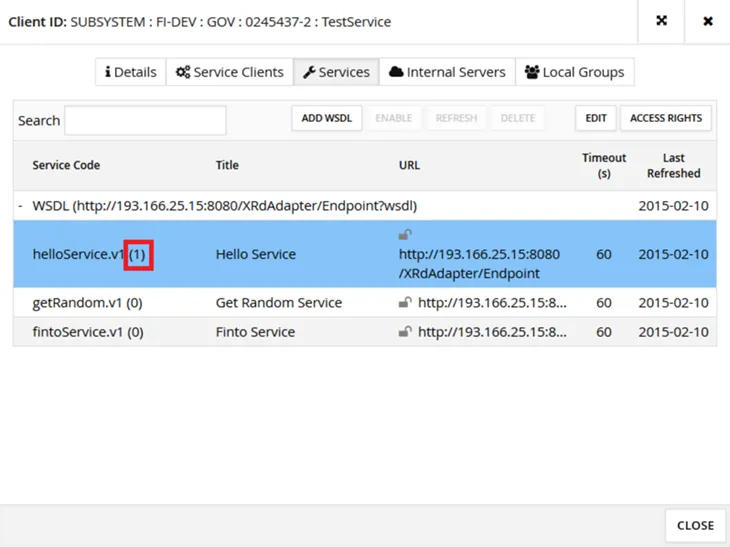
The appearance of the lock symbol next to the URL address of the service indicates the protocol the security server uses:
- HTTP (grey open lock)
- HTTPS without certificate verification (yellow closed lock)
- HTTPS with certificate verification (green closed lock)
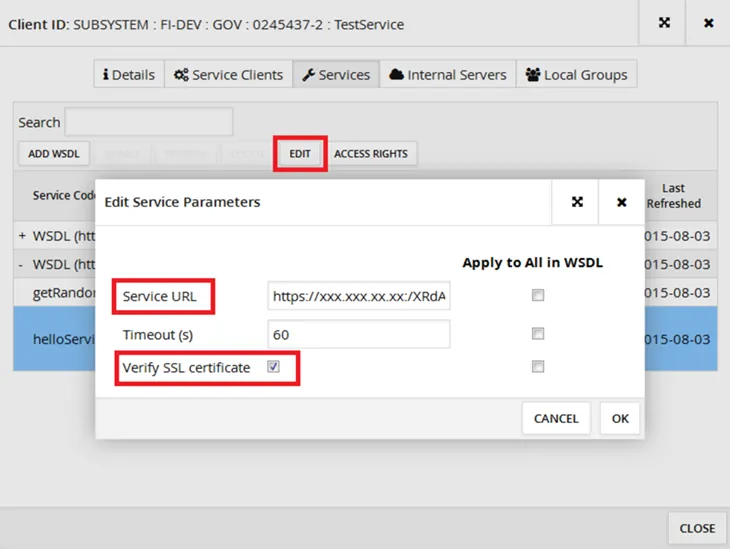
To edit the settings of an individual service, select the service and click the Edit button. In the Edit Service Parameters window, you can edit the URL address of the service, the timeout limit of service calls and define whether the certificate of the service is verified when using an HTTPS connection. The value of the Service URL parameter is read from the WSDL description by default.
Service connection settings
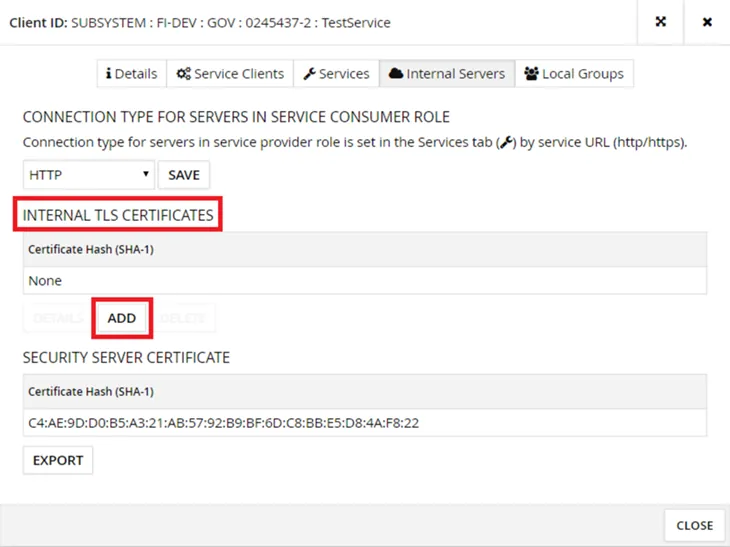
The security server can call the service to be connected using the HTTP or HTTPS protocol. If you use the HTTPS protocol and want to verify the certificate of the service to be connected, the certificate must be known to the security server. On the Internal Servers tab, add the certificate under Internal TLS Certificates. If the certificate is not verified, any certificate, including self-signed certificates, will do.
When using the HTTPS protocol, the certificate of the service to be connected must be added to the security server also at the operating system level, see the separate article for more information. This must also be done if the certificate is not verified. If the certificate is not added to the security server at the operating system level, the security server will not be able to retrieve the WSDL description of the service to be connected. The actual service invocation and WSDL description retrieval are implemented in different ways, which currently requires the certificate to be added twice.
If the service to be connected requires TLS client authentication, the security server sends its own internal certificate (available for download from Security Server Certificate → Export, if needed).
By default, TLS 1.2 and the following PFS Cipher Suites are allowed for traffic between the security server and the service to be connected:
- TLS_ECDHE_RSA_WITH_AES_128_GCM_SHA256*
- TLS_ECDHE_RSA_WITH_AES_128_CBC_SHA256*
- TLS_ECDHE_RSA_WITH_AES_256_GCM_SHA384*
- TLS_ECDHE_RSA_WITH_AES_256_CBC_SHA384*
- TLS_DHE_RSA_WITH_AES_128_GCM_SHA256
- TLS_DHE_RSA_WITH_AES_128_CBC_SHA256
- TLS_DHE_RSA_WITH_AES_256_CBC_SHA256
- TLS_DHE_RSA_WITH_AES_256_GCM_SHA384.
(*) not enabled on RHEL if OpenJDK is used
Run the following command from the command line of the security server to verify that the service you are connecting supports the encryption settings required by the security server:
openssl s_client -tls1_2 -cipher ’EDH+aRSA+AES:!SHA’ -connectIf the security server does not allow the required Cipher Suite or protocol by default, you can configure new encryption settings in the following file:
/etc/xroad/conf.d/local.iniThe values added to the file overwrite the values specified in other files, so they always take precedence. local.ini changes are preserved even if the security server is updated, since the file is not overwritten during the update installation. If you want to revert to the default, remove the setting you have defined in the local.ini file.
To enable the changes you have made, restart the xroad-proxy service.
For example, in the case of IIS servers, the encryption settings for the security servers have had to be extended to:
#local.ini
[proxy]
client-tls-protocols=TLSv1.1,TLSv1.2
client-tls-ciphers=TLS_ECDHE_RSA_WITH_AES_128_GCM_SHA256,
TLS_ECDHE_RSA_WITH_AES_128_CBC_SHA256,
TLS_ECDHE_RSA_WITH_AES_256_GCM_SHA384,
TLS_ECDHE_RSA_WITH_AES_256_CBC_SHA384,
TLS_DHE_RSA_WITH_AES_128_GCM_SHA256,
TLS_DHE_RSA_WITH_AES_128_CBC_SHA256,
TLS_DHE_RSA_WITH_AES_256_CBC_SHA256,
TLS_DHE_RSA_WITH_AES_256_GCM_SHA384,
TLS_RSA_WITH_AES_256_CBC_SHA256,
TLS_RSA_WITH_AES_256_CBC_SHA,
TLS_RSA_WITH_AES_128_CBC_SHA256,
TLS_RSA_WITH_AES_128_CBC_SHA