Renewing soon-to-expire certificates on the security server
Certificates used in the Suomi.fi Data Exchange Layer must be renewed regularly. The renewal interval varies depending on the certificate type and environment, ranging from six months to two years.
Certificate renewal checklist
- Authentication certificate: 6 months (production), 1 year (test)
- Signing certificate: 2 years
- Start the renewal process approximately one month before expiry
Detailed step-by-step instructions for renewing certificates are provided below.
Certificate validity periods in the Data Exchange Layer
Signing certificates are currently valid for two years in both test and production environments. The validity period was extended to two years in 2025.
The validity period of authentication certificates varies by environment.
- In the production environment, authentication certificates are currently valid for 6 months
- In the test environment, authentication certificates are valid for 1 year
If certificates expire, your services will stop functioning in the Data Exchange Layer. Start the renewal process in good time.
Read more about how to check the certificate validity periods.
Renewing certificates
The renewal process takes at least one week, so we recommend that you start the process well in advance (for example, about one month before expiry) to ensure there is enough time to resolve possible issues and avoid service interruptions.
Old and new certificates can be used simultaneously. Do not remove the old certificate until the new one has been successfully activated.
- We recommend that the start date of the new certificate is set so that it slightly overlaps with the validity period of the current certificate.
- When planning the timing, also take into account any absences and holiday periods.
Manual certificate renewal consists of:
- administrative renewal in the DVV e-services (performed by the organisation from 6 May 2026 onwards)
- installing the new certificates on the security server
Remember to renew certificates in both environments:
- signing certificates
- authentication certificates
Certificates are now created using the new certificate types:
- G5R in the production environment
- G2R in the test environment
The old G3 certificate type is no longer used.
If your security server has been inactive for a long time and does not have valid certificates, follow the onboarding instructions and restart the Data Exchange Layer onboarding process. For further information: palveluvayla-kayttoonotot@dvv.fi
Note. If you are an intermediary providing a shared security server for multiple organisations, renew each organisation’s signing certificate before it expires.
Reminder messages about certificate expiry
If you have previously renewed certificates using a service permission application, you no longer need to renew them via that process.
For subsequent renewals, the technical contact person will receive email reminders (1 month and 2 weeks) before certificate expiry.
Reminders only inform about expiring certificates and do not renew them automatically. New certificates must be requested separately via the DVV e-services.
Renew the certificates mentioned in the reminder message following the instructions on this page.
Renewing Certificates When Using X-Road Version 7.4 or Later
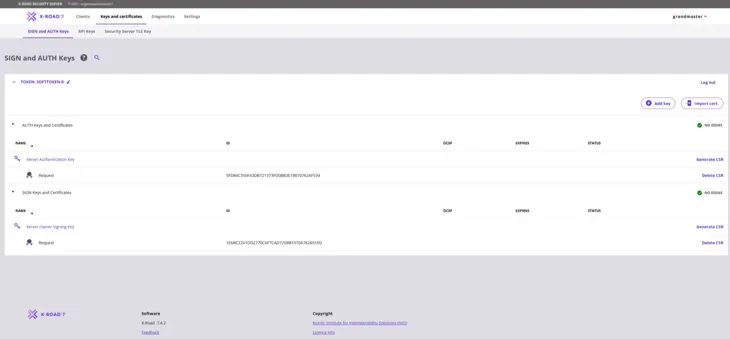
1. Creating certificate requests for signing and authentication certificates to be renewed
1.1 Signing Certificate request
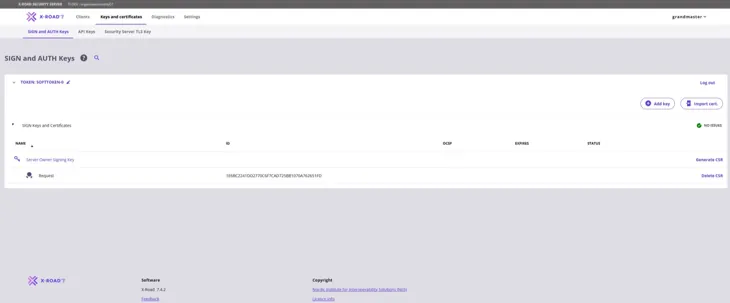
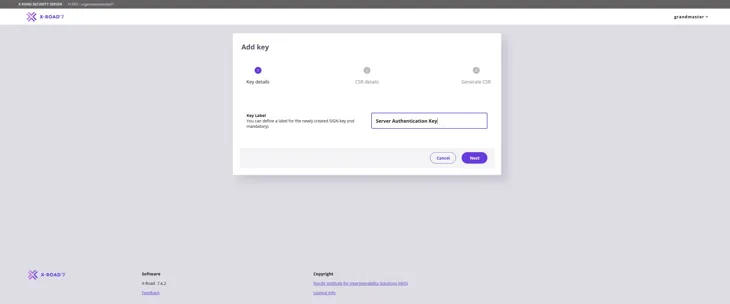
Create the Signing Certificate request first. Start by clicking the Add Key button to create a key.
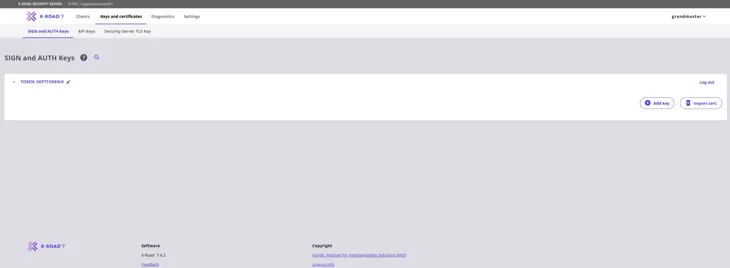
Give a name that describes the purpose of the key. This way, the key can easily be found in the table on the key management page. Press Next to move forward.
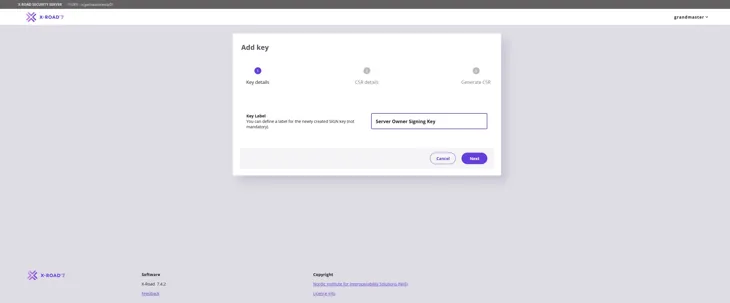
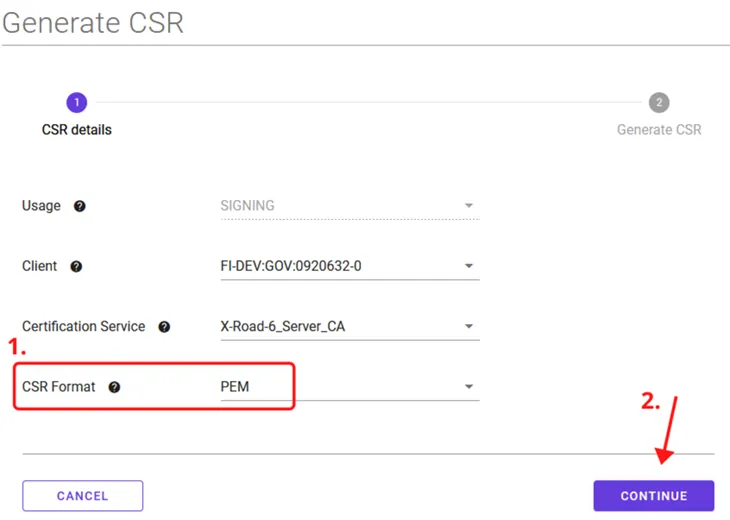
Fill in the information required for the Signing Certificate request as follows:
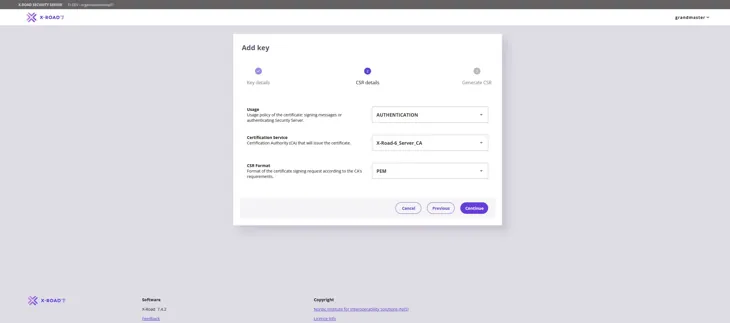
Usage: Verify that SIGNING is selected from the pull-down menu.
Client: Use the Business ID to verify that the correct organisation is selected from the pull-down menu.
Certification Service: Use the Certificate Authority (CA) provided by the Digital and Population Data Services Agency: for the production environment (FI) use G5R and for the test environment (FI-TEST) use G2R.
CSR Format: Select PEM.
Click the Continue button to proceed.
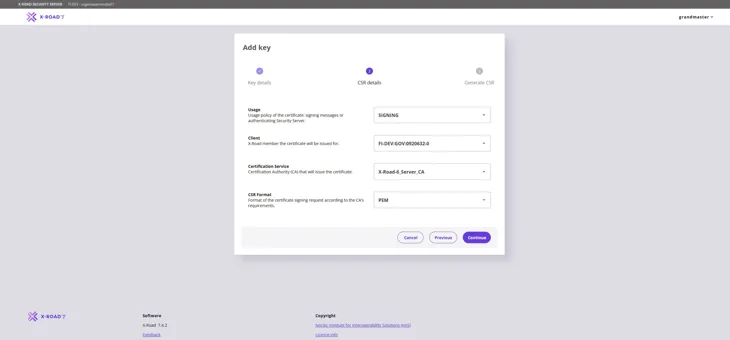
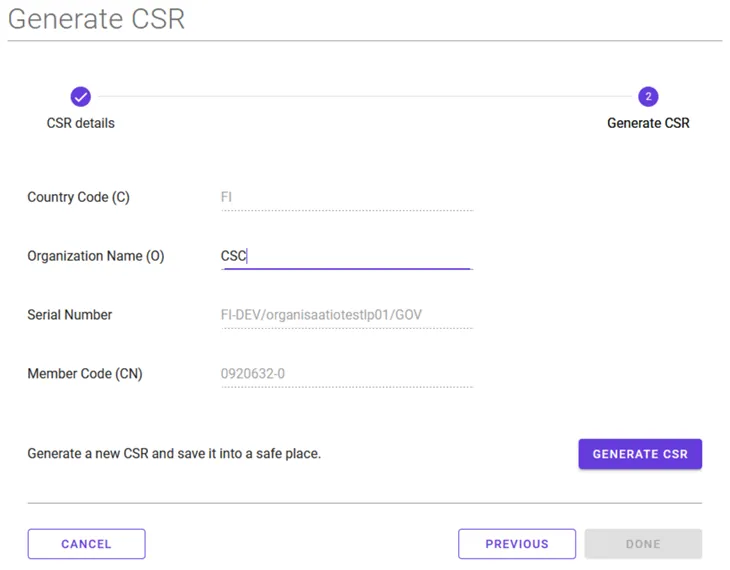
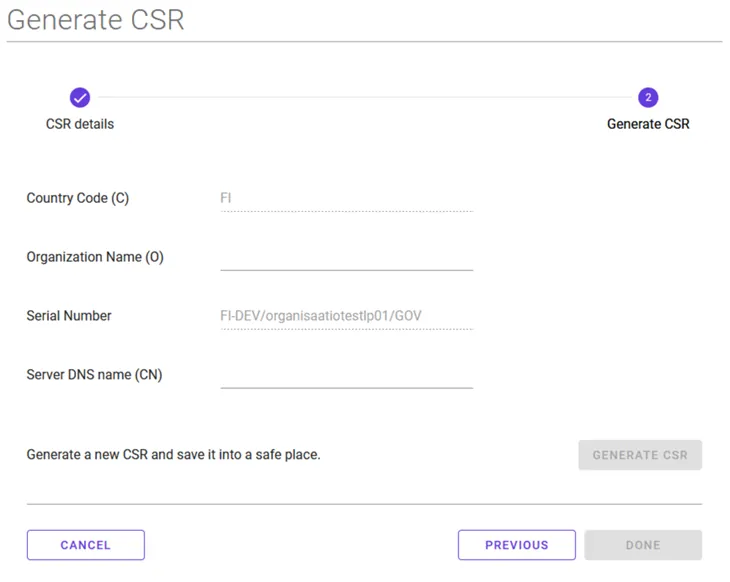
In the window that opens, enter the FQDN name (SAN) of the Security Server you added earlier and the name of the organisation (O) that owns the Security Server. Then click the Generate CSR button. Verify that you have entered the name of the organisation correctly. If the information is incorrect, the Signing Certificate request becomes incorrect.
Save the Signing Certificate request downloaded by your browser.
1.2 Authentication Certificate request
Next, create an Authentication Certificate request. Start by creating a new key in the Keys and Certificates view: select the Token of the server and then select Add Key.
Enter a name that describes the purpose of the key to be generated and click Next.
Fill in the information required for the Authentication Certificate request as follows:
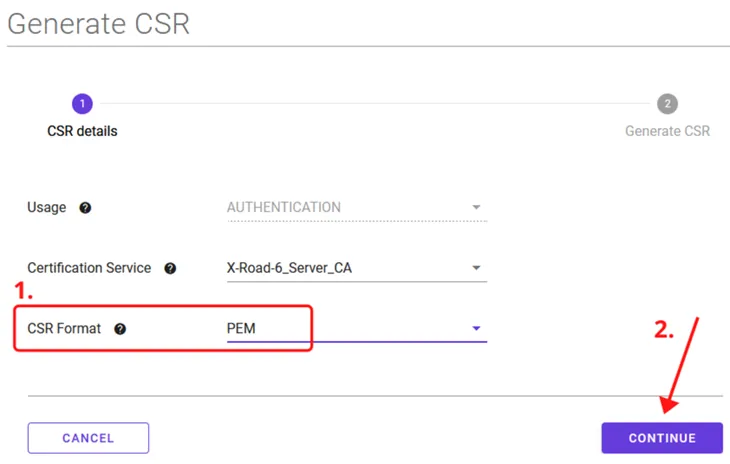
Usage: Verify that AUTHENTICATION is selected from the pull-down menu.
Certification Service: Use the Certificate Authority (CA) provided by the Digital and Population Data Services Agency: for the production environment (FI) use G5R and for the test environment (FI-TEST) use G2R.
CSR Format: Select PEM.
Click the Continue button to proceed.
In the window that opens, again enter the name of the organisation (O) that owns the Security Server you added and the FQDN (CN) of the server. Please note! Enter the Security Server name also in the Subject Alternative Name (SAN) field. Verify that you have entered the name and business ID of the organisation correctly. If the information is incorrect, the Authentication Certificate request becomes incorrect.
Then select Generate CSR.
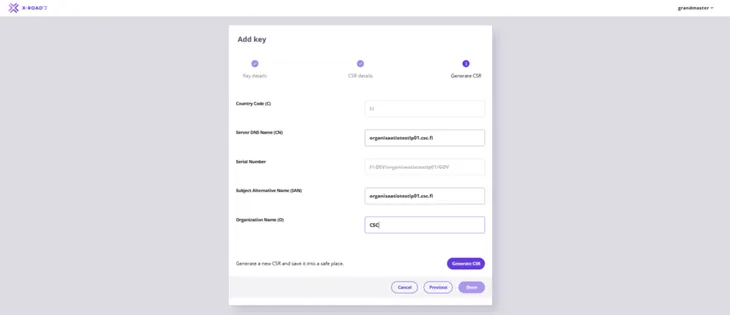
Save the Authentication Certificate request downloaded by your browser.
1.3 Processing certificate requests
The certificates required for the Data Exchange Layer are applied for in the Digital and Population Data Services Agency’s (DVV) e-services.
Proceed to the e-services and complete the certificate applications. The signing and authentication certificate requests created earlier are attached to the certificate application either at the time of submission or later by the technical contact person specified in the application. More detailed application instructions can be found here:
DVV returns the signed certificates to the technical contact person. You can then proceed by installing the signed certificates on the security server as described in the next step.
Note! Installation (import) of the authentication certificate on the security server is only possible once the certificate becomes valid. If you attempt to install the authentication certificate before its validity begins, the user interface will display an error message.
2. Installing signed certificates
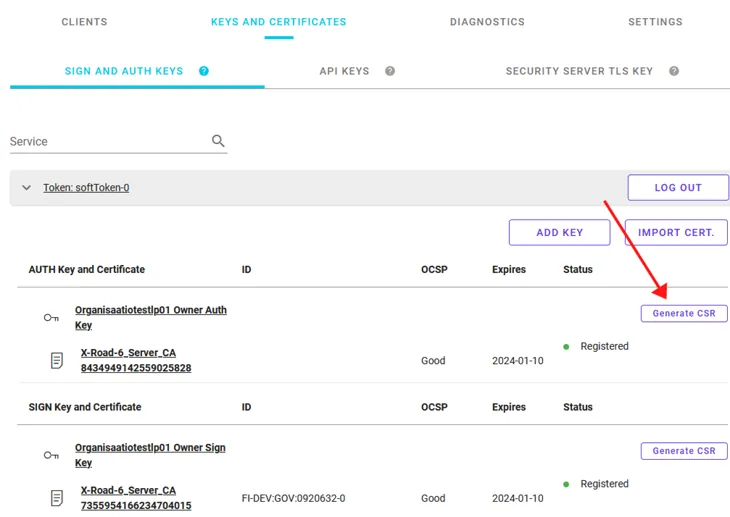
To start installing the signed certificates on the security server, go to the Keys and Certificates page. Locate the Authentication Certificate that you created on the page and click Import Cert. Import the Signed Authentication certificate you received from DVV.
When a signed Authentication Certificate has been installed, its Status column shows the text “Saved”.
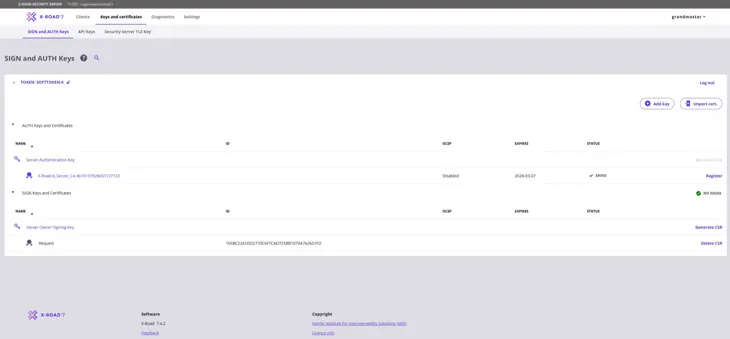
Repeat the steps above to import the Signing Certificate. Select Import Cert. and import the signed Signing Certificate you received from DVV.
After the signed Signing Certificate has been installed, its Status column contains a green ball icon and the text “Registered”. It is then correctly installed.
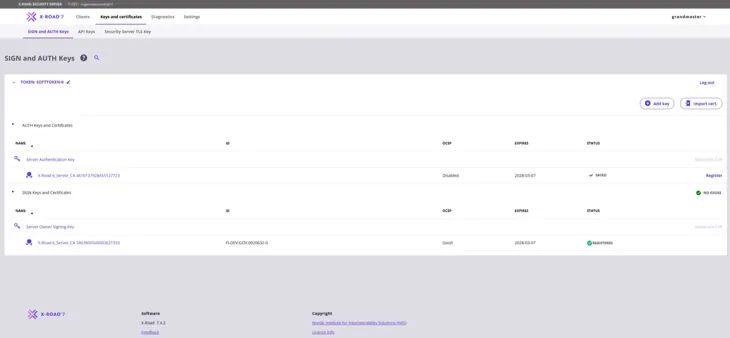
The Authentication Certificate must still be registered separately. Click Register to begin.
Enter the FQDN of the server and click Add.
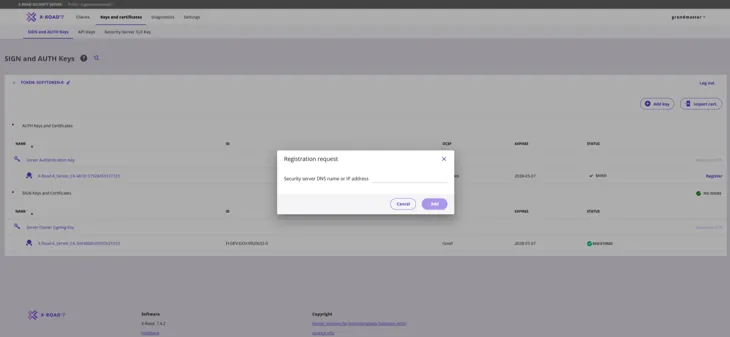
The Authentication Certificate should display "Status: Registration in progress".
2.1 Request approval of the registration request
After the previous step, the registration request must be approved by the Data Exchange Layer’s administration. Send a message to the administration where you:
- request that the registration request be approved, and
- provide the FQDN name of your security server.
Send the message to palveluvayla@palveluvayla.fi.
Contact the administration also if the registration fails for any reason.
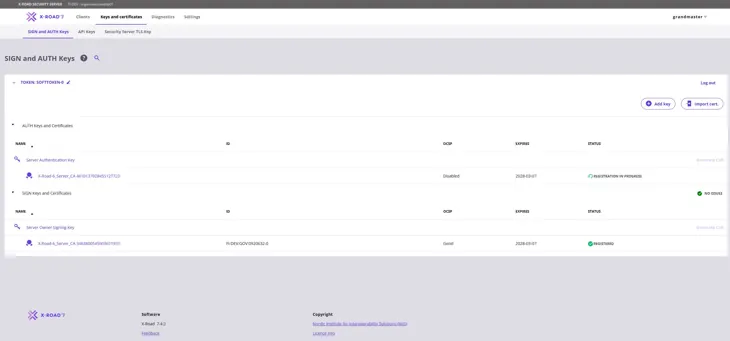
When the Data Exchange Layer administration has approved your server registration, the Status column of the Authentication Certificate should also contain a green ball icon and the text “Registered”. To activate the Authentication Certificate, click the number sequence below “Server Authentication Key” (highlighted in the figure below).
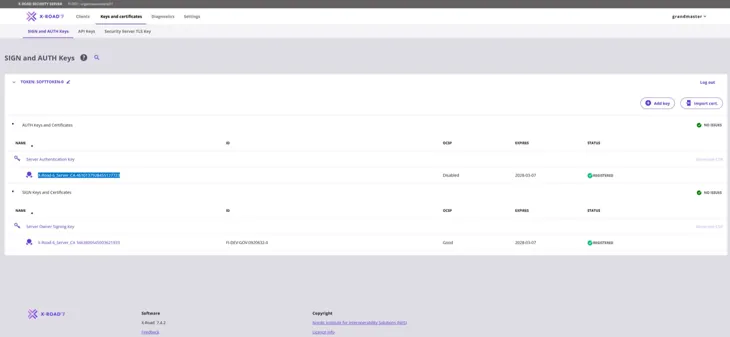
After you have clicked the number sequence below “Server Authentication Key”, the following window will open. Continue by clicking Activate.

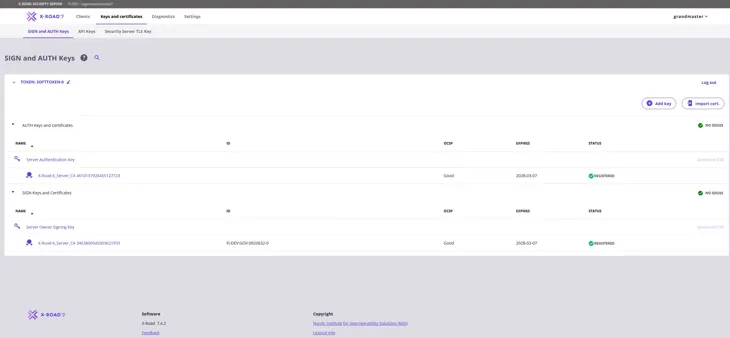
The OCSP status of the Authentication Certificate will change to “Good” in approximately 10-30 minutes, after which the security server will be ready for use.
Please note! Leave the soon-to-expire certificates on the security server for at least 24 hours so that the new certificates have time to propagate and the operation of the security server will not be interrupted. The old certificates will not interfere with the functioning of the new certificates.
When the OCSP response of the new certificates is Good and the Status is Registered, you can remove the old certificates by following instructions in the support article Removing Certificates from the Security Server.
Renewing certificates in the security server’s management user interface when using a version older than X-Road 7.4
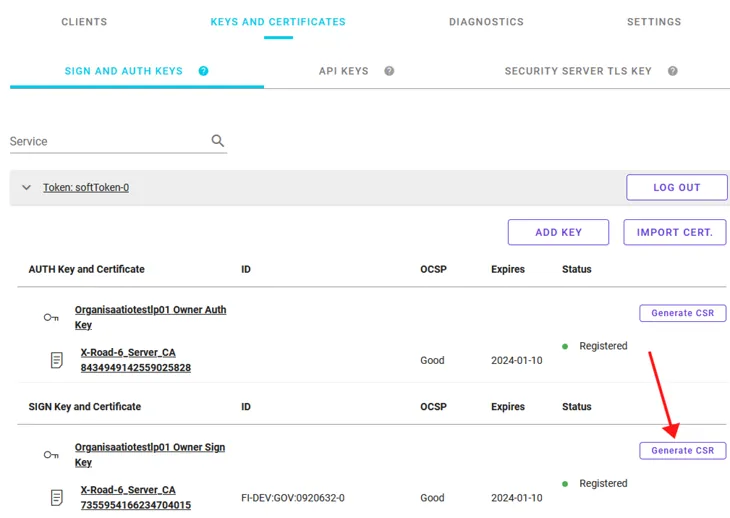
1. Go to the Keys and Certificates tab of the management user interface of the security server.
2. Select Generate CSR at the signing key you want to renew.
3. Select the PEM format (recommended by the Digital and Population Data Services Agency) as the CSR format and click Continue.
4. Enter the requested information and select Generate CSR. Downloading of the certificate request will now start. Save the downloaded signing certificate request to your computer. See our support article for assistance for creating signing and authentication certificate requests.
5. Select Generate CSR at the authentication certificate you want to renew.
6. Select the PEM format (recommended by the Digital and Population Data Services Agency) as the CSR format and click Continue.
7. Enter the requested information and select Generate CSR. Downloading of the certificate request will now start. Save the downloaded authentication certificate request to your computer. See our support article for assistance for creating signing and authentication certificate requests.
8. The certificates required for the Data Exchange Layer are applied for in the Digital and Population Data Services Agency’s (DVV) e-services. Proceed to the e-services and complete the certificate applications. The signing and authentication certificate requests created earlier are attached to the certificate application either at the time of submission or later by the technical contact person specified in the application.
More detailed application instructions can be found here:
DVV returns the signed certificates to the technical contact person. You can then proceed as described in the next step.
9. When you receive the certificates corresponding to your certificate requests from DVV, you should add them to their own keys at the Keys and Certificates tab. Read more about the installation of signed certificates.
Please note! Leave the soon-to-expire certificates on the security server for at least 24 hours so that the new certificates have time to propagate and the operation of the security server will not be interrupted. The old certificates will not interfere with the functioning of the new certificates.
When the OCSP response of the new certificates is Good and the Status is Registered, you can remove the old certificates by following instructions in the support article Removing Certificates from the Security Server.