
3. Join the test environment
After this section you have
- gotten installation instructions for the test environment after approval of the user permit application
- opened the firewalls
- installed the security server software
- configured the security server
- added a subsystem to the security server
- connected the information system to the security server
- added your service to your security server
- deployed the adapter service if necessary
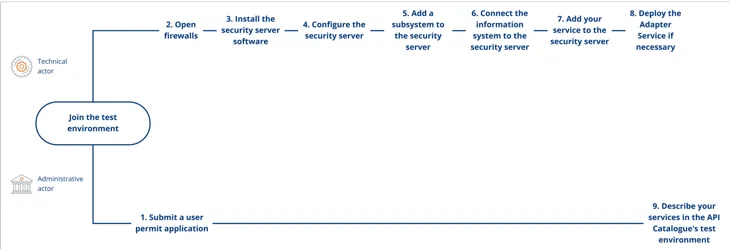
You must join the Data Exchange Layer test environment before you can proceed to the production environment. Joining the test environment consists of sending a user permit application and of a technical deployment process, which your organisation can outsource to the technical solution provider of its choice.
Please note that you will need separate security servers for the test and production environments. We recommend that the technical implementation of your production environment corresponds with the test environment, for example, the security server must be implemented in the same way in both environments. Read more on planning and deploying the security server solution in the previous sections.
This section briefly describes the steps required to join the test environment. The technical contact person is responsible for steps 2–8.
- Note! In practice, the technical onboarding process (steps 2–8) can be carried out either by a technical solutions provider or by your own organisation, depending on whether you have outsourced the security server solution.
- If you use a shared security server, you can skip steps 2–4.
- Administrative contact person submits a user permit application for the test environment.
- Open firewalls according to the instructions that you previously received.
- Install the security server software. The instructions for installing the security server depend on your server’s operating system. After this, the host server will become the security server, which you can use to connect your information system to the Data Exchange Layer.
- Configure the security server. The security server can be configured programmatically or manually.
- Add a subsystem to the security server. The subsystem will function as an interface to the Data Exchange Layer for retrieving and providing information.
- Connect the information system to the security server. In this way the information is transferred from your information systems to the Data Exchange Layer and vice versa.
- If you plan to provide services to other organisations in the Data Exchange Layer, add your services to the security server. Services are added to one of the previously created subsystems.
- If you plan to provide services to other organisations in the Data Exchange Layer, deploy the adapter service if necessary. You will need an adapter service if you provide SOAP services through the Data Exchange Layer that are not tailored to the requirements of the Data Exchange Layer.
- Administrative contact person describes the organisation and the possible services in the Test API Catalogue
1. Administrative contact person submits a user permit application for the test environment
Once the security server solution has been selected and the platform server has been prepared for deployment, your organisation’s administrative contact person submits an electronic user permit application to the Digital and Population Data Services Agency.
Before submitting the application, make sure that:
1. The security server has been named according to the instructions.
2. The security server has an operating system installed or, in the case of a containerised security server, a Linux platform with Docker installed.
- Read more about installing an RHEL security server
- Read more about installing an Ubuntu security server
- Read more about the containerised security server option
Once the access rights application has been approved, your organisation’s technical contact person will receive installation instructions for joining the test environment by email. The instructions are sent from palveluvayla@palveluvayla.fiOpens in a new window.. You will receive the following materials by e-mail:
- Configuration Anchor
- Instructions for opening firewalls
- Instructions for installing the security server software (links to these can also be found in these instructions): Licenses of the application components
2. Open firewalls
Based on the instructions you have received, open the necessary ports from your server to form needed connections to the Data Exchange Layer. It is extremely important with regard to information security that only certain ports are open in the correct direction.
Due to information security, Data Exchange Layer’s Maintenance team will send you instructions by e-mail on how to open ports. The instructions are sent to the technical contact person indicated in the user permit application.
- If necessary, you can get instructions for opening firewalls even before you submit your user permit application. In this case, contact the Data Exchange Layer Maintenance team at palveluvayla@palveluvayla.fiOpens in a new window..
Ports to be opened:
- My Computer Port 22 → Own Security Server, Own information System [Command Line Connection]
- My Computer Port 4000 → Own Security Server [Graphical Management Interface]
- Own information ← ports 80, 443 → Own Security Server [For retrieving information from the Data Exchange Layer]
- Own Security Server Ports 80, 4001 → Central Server Global Conf [central server connection 1]
- Own Security Server ← ports 5500, 5577 → Central Server Global Conf [central server connection 2]
- Own Security Server port 80 → Central Server Global Conf [for federation, central server connection 3]
- Own Security Server port 80 OCSP → Service [OCSP connection]
- Own Security Server ports 80, 443 → Timestamping Service [TSA connection]
- Own Security Server ports 5500, 5577 → Target Network Security Server [for the getRandom Test Service]
3. Install the security server software
Install the security server software on your platform server according to the instructions. After installation, the platform server becomes a security server that you will connect to the Data Exchange Layer test environment.
The installation steps depend partly on the operating system used.
See the instructions:
- Installing the operating system server software on a RHEL operating system
- Installing the operating system server software on a Ubuntu operating system
- Installation instructions for a Docker containerised security server
4. Configure the security server
After installation, you will have a security server that is ready to be configured. You have received an environment-specific configuration file, known as a configuration anchor, by email from Data Exchange Layer support.
Follow the instructions on the page Connecting a security server to the test or production environment support article and proceed as instructed. Make sure you follow the instructions for the test environment (FI-TEST).
Once step 4 has been completed, your security server has been successfully connected to the Data Exchange Layer test environment.
Changing the memory settings of the security server
If necessary, change the memory settings of your security server. The memory settings depend on the amount of central memory of the security server host. There are certain recommended memory settings for the security server and you can read about those in the separate support article.
5. Add a subsystem to the security server
Add at least one subsystem to the security server to enable data exchange through the Data Exchange Layer. The subsystem serves as an interface for retrieving and sharing information through the Data Exchange Layer. As a general rule, we recommend using information system-specific subsystems.
- An information system refers to your organisation’s information system that is connected to the security server so that information can be shared through the Data Exchange Layer or retrieved from the Data Exchange Layer into the information system. In some cases, several information systems forming a single logical entity may also use the same subsystem for service consumption.
If your organisation acts as a service provider in the Data Exchange Layer, we recommend creating one subsystem for each service you provide.
Add the subsystem through the security server administration interface. Follow the instructions on the page Connecting a new subsystem to a security server and deleting a subsystem from a security server support article.
6. Connect the information system to the security server
Once the security server and subsystems are in place, connect your information system to the security server. The connection between the information system and the security server is established through the subsystem that you created on the security server.
Perform the connection in the security server administration interface. Follow the instructions in the Connecting an information system to a security server support article.
7. If you plan to provide services to other organisations in the Data Exchange Layer, add your services to the security server
If your organisation acts as a service provider, you must add your services to the security server. Once you have added a subsystem to the security server and it has been registered, add a new service under that subsystem through the security server administration interface.
Follow the instructions on the page Adding a new service to the security server support article.
8. If you plan to provide services to other organisations in the Data Exchange Layer, deploy the adapter service if necessary
Before starting the onboarding process, assess whether your organisation requires an adapter service.
You need an adapter service
- whenever you provide SOAP services through the Data Exchange Layer that have not been specifically designed for the Data Exchange Layer in accordance with its requirements
- if your organisation does not use REST interfaces for data exchange
You do not need an adapter service if the SOAP service has been designed specifically for the Data Exchange Layer and your organisation uses REST interfaces for data exchange.
Read more about the available implementation options on the Data Exchange Layer's Adapter Service - Suomi.fi Data Exchange Layer - Suomi.fi for Service Developers page. Review the available alternatives and implement the adapter service in the way that best suits your organisation.
9. Administrative contact person describes the organisation and the possible services in the Test API Catalogue
Finally, the administrative contact person enters your organisation’s details and any service descriptions in the Test API Catalogue. More detailed instructions are available in the API Catalogue guidance on the page Instructions and support - LiityntäkatalogiOpens in a new window..
After installation, please note
Maintain the connection to the test environment even after joining the production environment so that you can continue to use it to test new services and connections. In addition, if there are problems with transitioning to the production environment, you can compare the implementation with the implementation of the test environment and possibly determine the cause of the problem in this way.
After your organisation has joined the test environment, test connections to ensure that you have successfully joined the Data Exchange Layer. Read more about testing in the next section.