5. Proceed to the production environment
After this section you have
- prepared to deploy the new security server
- gotten installation instructions for the production environment after approval of the user permit application
- opened the firewalls
- installed the security server software
- configured the security server
- added a subsystem to the security server
- connected the information system to the security server
- added your service to your security server
- deployed the adapter service if necessary
Joining the production environment is carried out in the same as joining the test environment. Proceeding to the production environment consists of sending a user permit application and of a technical connection process, which your organisation can outsource to the technical solution provider of its choice.
You will need a new security server for the production environment. We recommend that the technical implementation of your production environment corresponds with the test environment, for example, the security server should be implemented in the same way in both environments. Do not remove your security server or services from the test environment. If you encounter problems with transitioning to the production environment, you can compare the implementation with the implementation of the test environment and possibly determine the cause of the problem in this way.
You can proceed to the production environment once:
- the administrative person has submitted a user permit application to the production environment,
- you have successfully joined the Data Exchange Layer test environment and
- you have tested that your services work in the test environment without issues.
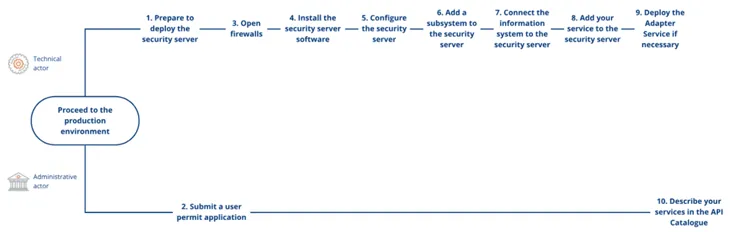
This phase describes the steps for joining the production environment.
- Prepare to deploy the security server.
- The administrative person submits a user permit application for the production environment
- Open firewalls according to the instructions that you previously received.
- Install the security server software. The instructions for installing the security server depend on your server’s operating system. After this, the platform server will become the security server, which you can use to connect your information system to the Data Exchange Layer.
- Configure the security server. The security server can be configured programmatically or manually.
- Add a subsystem to the security server. The subsystem will function as an interface to the Data Exchange Layer for retrieving and sharing information.
- Connect the information system to the security server. In this way the information is transferred from your information systems to the Data Exchange Layer and vice versa.
- If you plan to provide services to other organisations in the Data Exchange Layer, add your service to the security server. The services will be added to one of the previously added subsystems.
- If you plan to provide services to other organisations in the Data Exchange Layer, deploy the adapter service if necessary. You will need an adapter service if you provide SOAP services through the Data Exchange Layer that are not tailored to the requirements of the Data Exchange Layer.
- Administrative person describes the organisation and the possible services in the API Catalogue
The administrative person is responsible for the steps 2 and 10. The other steps belong to the technical deployment process. If you use a shared security server you can pass the steps 1, and 3–5.
1. Prepare to deploy the security server
You will need a separate security server for each environment. Therefore, begin transitioning to the production environment by preparing to deploy a new security server solution. We recommend that you use the same kind of security server in both the test and production environments.
For more detailed instructions on selecting a security server solution, see phase 2.
2. The administrative person submits a user permit application for the production environment
Once the security server solution is selected and the host server is installed and configured administrative person sends an electronic application to the Digital and Population Data Services Agency. Make sure that the following things are done correctly:
1. The security server is named correctly.
2. The security server has RHEL 8 eller Ubuntu 22.04LTS eller 24.04LTS operating system installed, or if using a containerised security server, a Linux platform with Docker installed.
- Read more about installing an RHEL security server
- Read more about installing an Ubuntu security server
- Read more about the containerised security server option
Once the user permit application has been approved, the technical contact person specified in the application will receive an email with installation instructions for joining the production environment. The instructions are sent from palveluvayla@palveluvayla.fiOpens in a new window.. You will receive the following materials by e-mail:
- Configuration Anchor
- Instructions for opening firewalls
- Instructions for installing the security server software (links to these can also be found in these instructions): Licenses of the application components
3. Open firewalls
Based on the instructions you have received, open the necessary ports from your server to form needed connections to the Data Exchange Layer. It is extremely important with regard to information security that only certain ports are open in the correct direction.
Due to information security, Data Exchange Layer’s Maintenance team will send you instructions by e-mail on how to open ports. The instructions are sent to the technical contact person indicated in the user permit application. If necessary, you can get instructions for opening firewalls even before you submit your user permit application. In this case, contact the Data Exchange Layer Maintenance team at palveluvayla@palveluvayla.fiOpens in a new window..
Ports to be opened:
- My Computer Port 22 → Own Security Server, Own information System [Command Line Connection]
- My Computer Port 4000 → Own Security Server [Graphical Management Interface]
- Own information ← ports 80, 443 → Own Security Server [For retrieving information from the Data Exchange Layer]
- Own Security Server Ports 80, 4001 → Central Server Global Conf [central server connection 1]
- Own Security Server ← ports 5500, 5577 → Central Server Global Conf [central server connection 2]
- Own Security Server port 80 → Central Server Global Conf [for federation, central server connection 3]
- Own Security Server port 80 OCSP → Service [OCSP connection]
- Own Security Server ports 80, 443 → Timestamping Service [TSA connection]
- Own Security Server ports 5500, 5577 → Target Network Security Server [for the getRandom Test Service]
4. Install the security server software
Follow the instructions to install the security server software on your host server. The host server will then become the security server that you connect to the Data Exchange Layer test environment. The installation steps will depend in part on the operating system in use. See the links below for instructions.
- Installing the operating system server software on a RHEL operating system
- Installing the operating system server software on a Ubuntu operating system
- Installation instructions for a Docker containerised security server
5. Configure the security server
After installation, you have a security server that is ready to be configured. You can configure the security server programmatically with automatic administration scripts (X-Road Toolkit) or manually via the GUI or administration interface.
Programmatical configuration with automatic administration scripts
X-Road Toolkit is used to automatically configure one or more security servers using scripts. The desired function and information of the Toolkit is configured in the YAML configuration file. The configuration can be run in two parts or in phases. Read more about X-Road Toolkit.
Manual configuration in the GUI
Use your browser to contact the GUI at:
https://{hostname}:4000Replace {hostname} with the name of the installed security server.
You have received an environment-specific configuration file, i.e. a configuration anchor, by e-mail from the Data Exchange Layer Maintenance team. Follow the instructions in the Connecting a security server to the test or production environment support article and complete the following steps accordingly. Be sure to follow the instructions for the test environment (FI-TEST).
- Log in with the main user ID you created when you installed the security server software.
- Install the configuration anchor (Support article heading: ” Configuring the server’s basic settings”).
- Fill in the following information in the window that opens:
Member Code: your organisation’s business ID.
Member Name: your organisation’s name. The system should automatically complete this.
Security Server Code: the unique identifier of the security server, typically the host part of the server name.
PIN: a code which you can choose and has a minimum length of 10 characters. - Add the Timestamping Service (TSA) System Parameters > Timestamping Services > Add. Select the target environment’s TSA service suggested by the administration interface.
- Create a signing certificate request: Keys and Certificates > Add Key. Complete the following information:
Usage: SIGNING
Client: Based on your business ID, your organisation
Certification Service: G5R
CSR Format: PEM - Create an authentication certificate request: Keys and Certificates > Add Key. Complete the following information:
Usage: AUTHENTICATION
Certification Service: G5R
CSR Format: PEM - Send the signing and authentication certificate requests you have created to the Data Exchange Layer maintenance team for review before submitting the actual certificate applications. For more detailed instructions, see Connecting a Security Server to the test or production environment (see section 3.3 Processing certificate requests).
- Install signed certificates: Keys and Certificates > Import Certificate.
- Click Activate to activate the authentication certificate.
- Click Register to register the authentication certificate.
Maintenance of the Data Exchange Layer will usually approve the registration in about one day. On the next business day, check the security server administration interface to see if registration is complete. You will be sent an email confirmation when registration is complete, but you will be notified of the registration status more quickly in the security server’s administration interface.
You have now successfully connected your security server to the Data Exchange Layer’s production environment.
Changing the memory settings of the security server
If necessary, change the memory settings of your security server. The memory settings depend on the amount of central memory of the security server host. There are certain recommended memory settings for the security server and you can read about those in the separate support article. The article provides also instructions on how to change the memory settings of a security server.
6. Add a subsystem to the security server
Add at least one subsystem to the security server. The subsystem enables data exchange and will function as an interface to the Data Exchange Layer for retrieving and sharing information.
We recommend using subsystems specific to the information system. An information system refers to your organisation’s information system to which the security server is connected, so that the information contained in the information system can be retrieved and shared in the Data Exchange Layer. In some cases, several information systems that form a single logical entity can also use the same subsystem to call services. If you are a service provider on the Data Exchange Layer, we recommend that you have one subsystem for each service you provide.
Add a subsystem through the security server management interface. Follow the instructions given in the Connecting a new subsystem to a security server and deleting a subsystem from a security server support article.
7. Connect the information system to the security server
When the security server and subsystems are in order, connect the information system to the security server. Connecting the information system to the security server takes place through the subsystem that you create on the security server. Use the security server’s administration interface to connect. Follow the instructions in the Connecting an information system to a security server support article.
Perform steps 1 and 2 on a server other than your security server.
1. Use the following command to create a private key for the information system in the command-line interface:
openssl genrsa -out clientprivatekey.pem 20482. Enter the following command to create a self-signed certificate for the key:
openssl req -new -x509 -key clientprivatekey.pem -out clientcert.pem -days 3653. Log into the security server’s administration interface and select Internal Servers by the subsystem where you want to connect the information system.
4. Select the type of connection between the information system and the security server from the Connection type for Servers in Service Consumer Role menu.
Always use the HTTPS protocol to ensure the connection between the information system and the security server is encrypted. The protocol requires that the information system presents a client certificate to use your services. Using HTTPS and client certificates is mandatory when several different organisations are using the same security server. In such a case, using a client certificate is the only way to prevent the organisations from calling the services of the Data Exchange Layer through each other’s subsystems.
5. Add a client certificate required by the HTTPS protocol that is stored in the clientcert.pem file that you created, internal TLS Certificates > Add.
6. Select Security Server Certificate > Export to download the security server's internal certificate to the subsystem.
You can easily test the client certificate by calling the getRandom test service with the Curl software. Note that this test must be performed on a server other than the security server. For instructions on how to test, see the Test the client certificate heading in the Connecting an information system to a security server support article.
Call the getRandom test service with the subsystem under which you added the client certificate using the Curl command:
curl -E ./clientcert.pem --key ./clientprivatekey.pem -k -d @getRandom.xml --header "Content-Type: text/xml" -X POST https://{host}/If the client certificate is functioning correctly, the call will return a randomly generated number between 0 and 100.
8. If you plan to provide services to other organisations in the Data Exchange Layer, add your services to the security server
If you are a service provider, you must add your services to the security server. Once you have added a subsystem to your security server and it is registered, add a new service under it via the security server’s administration interface. Follow the instructions in the Adding a new service to the security server support article.
You can add two types of services:
- SOAP service To add a service, enter the URL address of the WSDL description.
- REST service To add a service, enter: the OpenAPI 3 Description path or REST API Base Path path.
Add SOAP Service
- In the Clients tab, select the subsystem to which you want to add the service.
- Add a WSDL description from the Services tab by selecting Add SOAP.
- Provide the URL address for the WSDL description. Add the service by selecting Add. A single WSDL description can contain an API description for one or more services.
- Activate the WSDL description using the toggle switch next to it.
- Set the service connection to HTTPS. For instructions, see the support article listed above under the Service connection settings heading.
- The next day, check that the service is visible in the API CatalogueOpens in a new window.. If the service is not visible in the API Catalogue, check that all the steps above have been completed and if necessary request help from palveluvayla@palveluvayla.fiOpens in a new window..
Add REST Service
- In the Clients tab, select the subsystem to which you want to add the service.
- Add the REST service in the Services tab by selecting Add REST.
- Select either REST API Base Path or OpenAPI3 Description as the address path type. Enter the URL and service code. Add a service by selecting Add.
- Activate the REST service using the toggle switch next to it. Before activation, check that the information on the service is correct. After activation, the service is available to users.
- The next day, check that the service is visible in the API CatalogueOpens in a new window.. If the service is not visible in the API Catalogue, check that all the steps above have been completed and if necessary request help from palveluvayla@palveluvayla.fiOpens in a new window..
Access rights
Assign service access rights to organisations that need access to the service you provide. You can also add access rights later from the same menu.
- Click on the service, and then select Access Rights.
- Select Add Subjects, and in the view that opens, select the subsystem for which you want to grant access to the service.
9. If you plan to provide services to other organisations in the Data Exchange Layer, deploy the adapter service if necessary
Assess whether your organisation needs an adapter service before starting the deployment process.
You need an adapter service
- whenever you provide SOAP services that have not been created separately for the Data Exchange Layer
- when your organisation does not use REST interfaces for data transfer
In practice, you do not need an adapter service when the SOAP service has been designed and implemented specifically for the Data Exchange Layer and and your organisation uses REST interfaces for data transfer. Read more in the Data Exchange Layer's adapter service support article. See the support article for information on different implementation options. Read more on them and implement the adapter service in the most appropriate way for you.
10. Administrative person describes the organisation and the possible services in the API Catalogue
Finally, the administrative person describes the details of your organisation and services in the API CatalogueOpens in a new window.. The following information about your services is needed for the description:
- What data can be accessed through the service
- What kinds of prerequisites and limitations apply to the use of the service
- How to access the service: deployment process and access rights
You can now start the production use of the Data Exchange Layer.
Also remember to take care of technical and administrative maintenance, such as keeping your organisation's information and the security server up to date.